


")


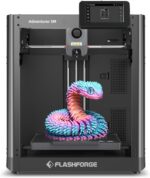

Product Description
The video showcases the product in use.The video guides you through product setup.The video compares multiple products.The video shows the product being unpacked. hero-video Merchant Video
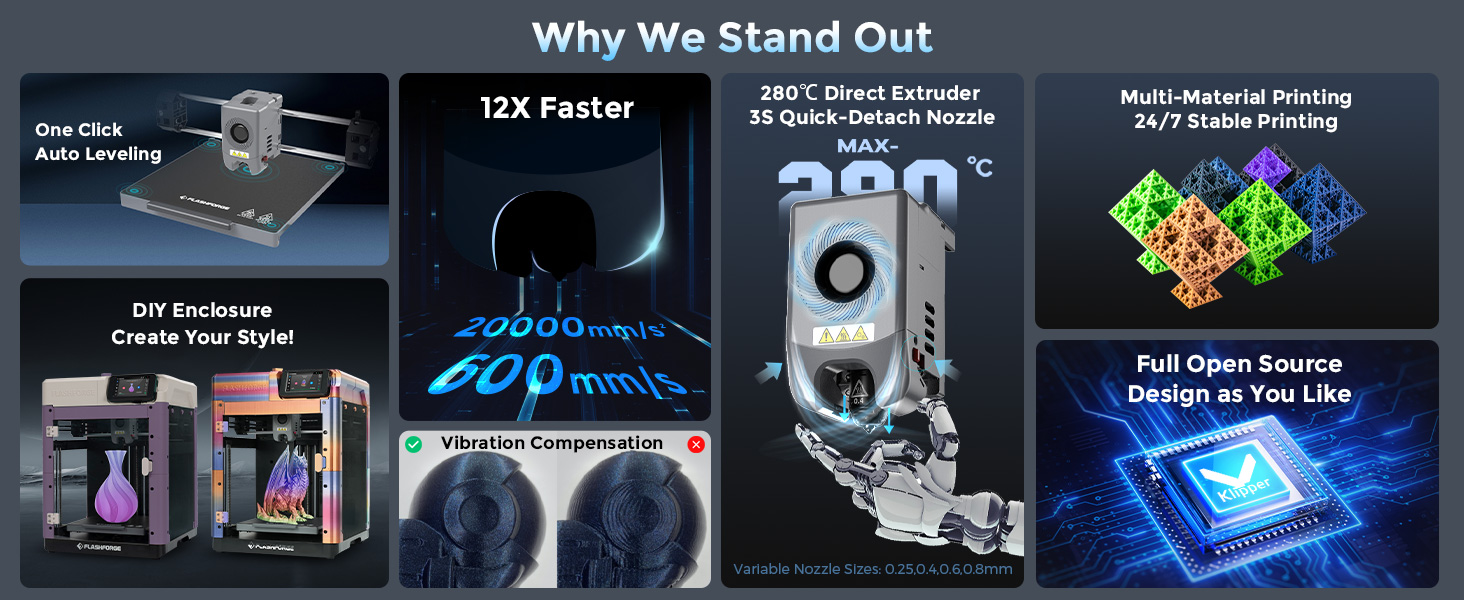
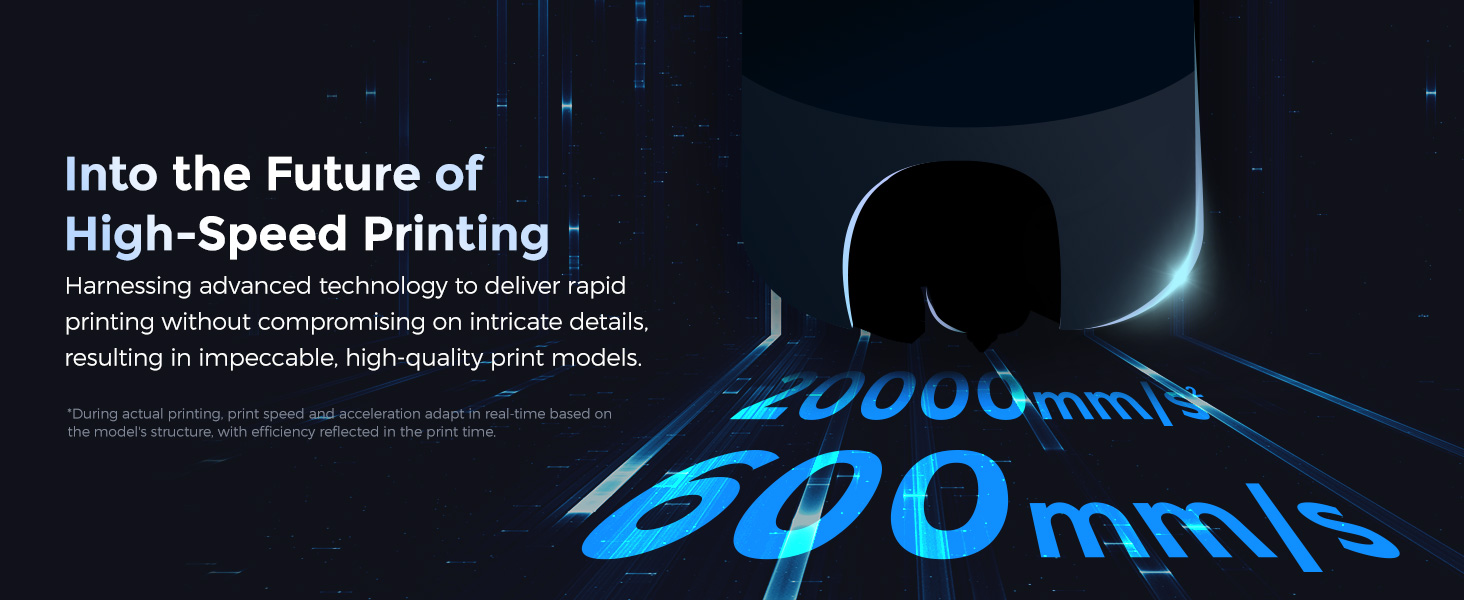
1 12X Ultra Faster
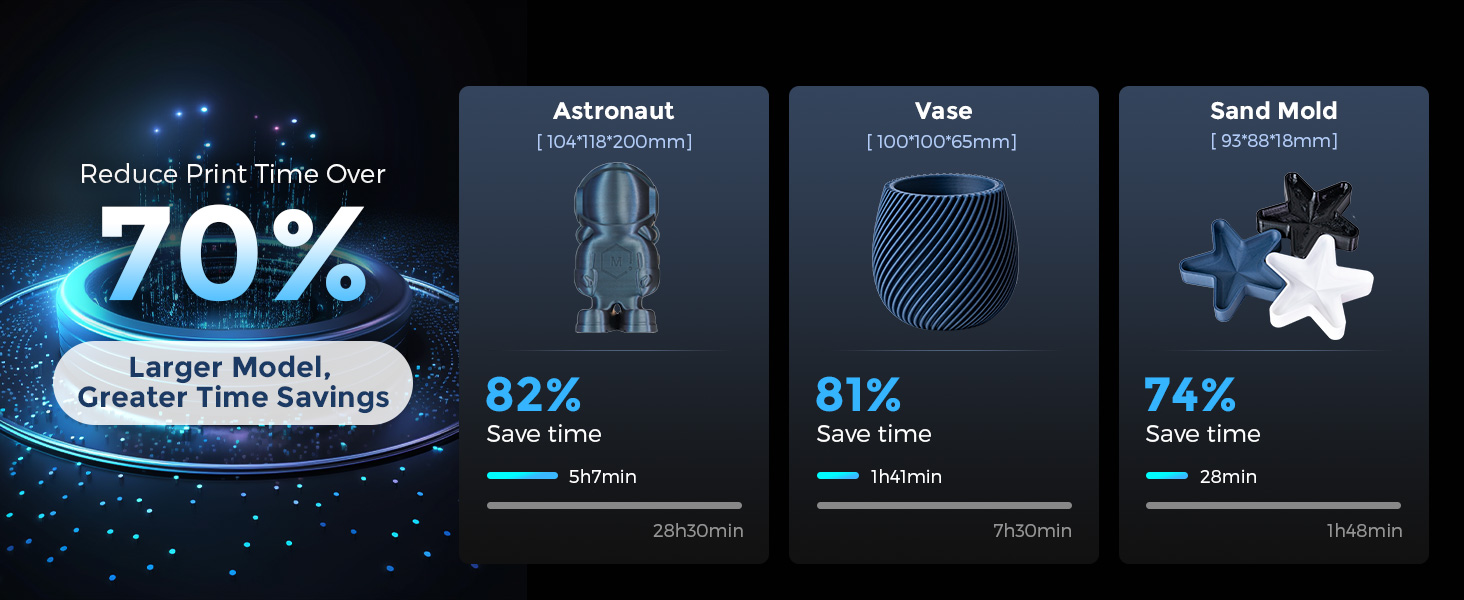
2 Reduced Print Time
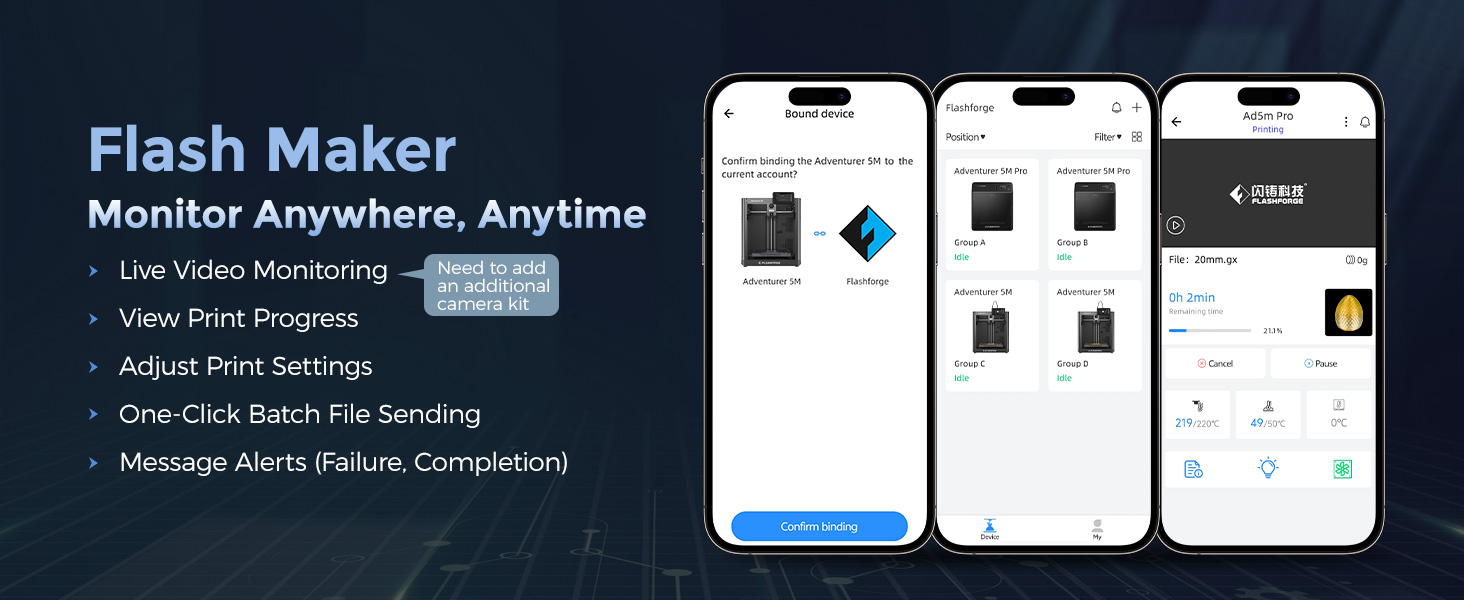
3 Support Mobile App
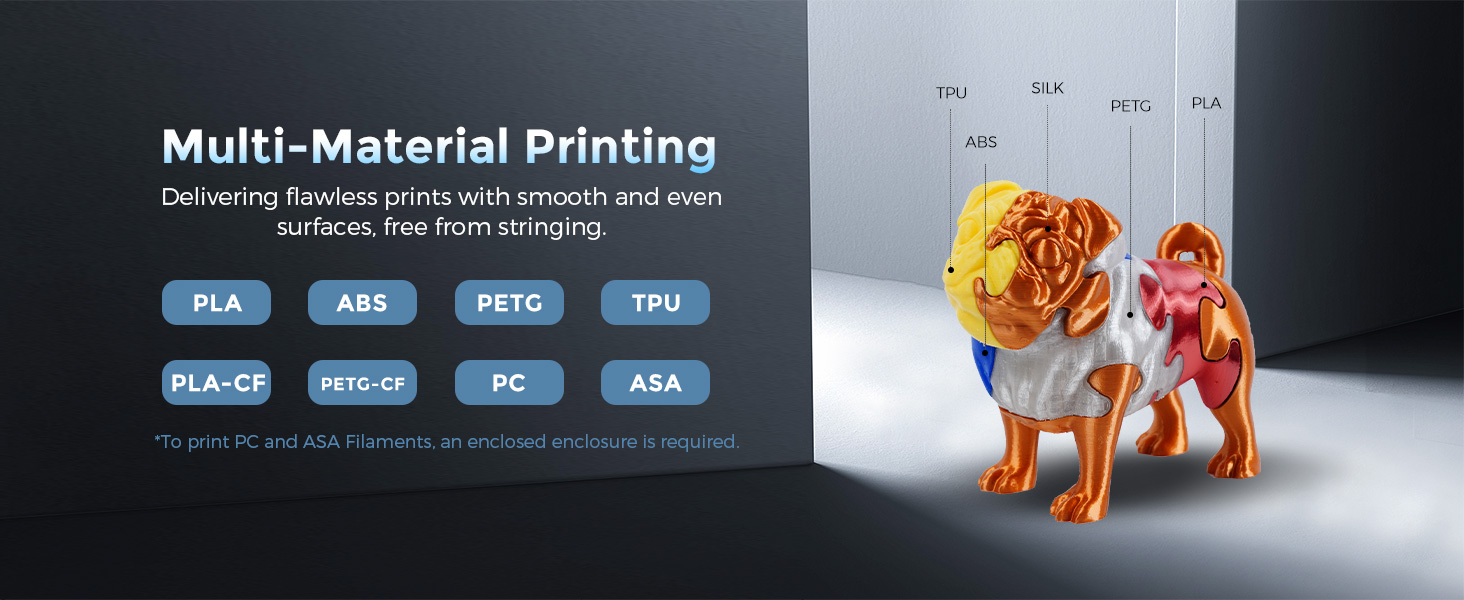
4 Multi-Material Printing
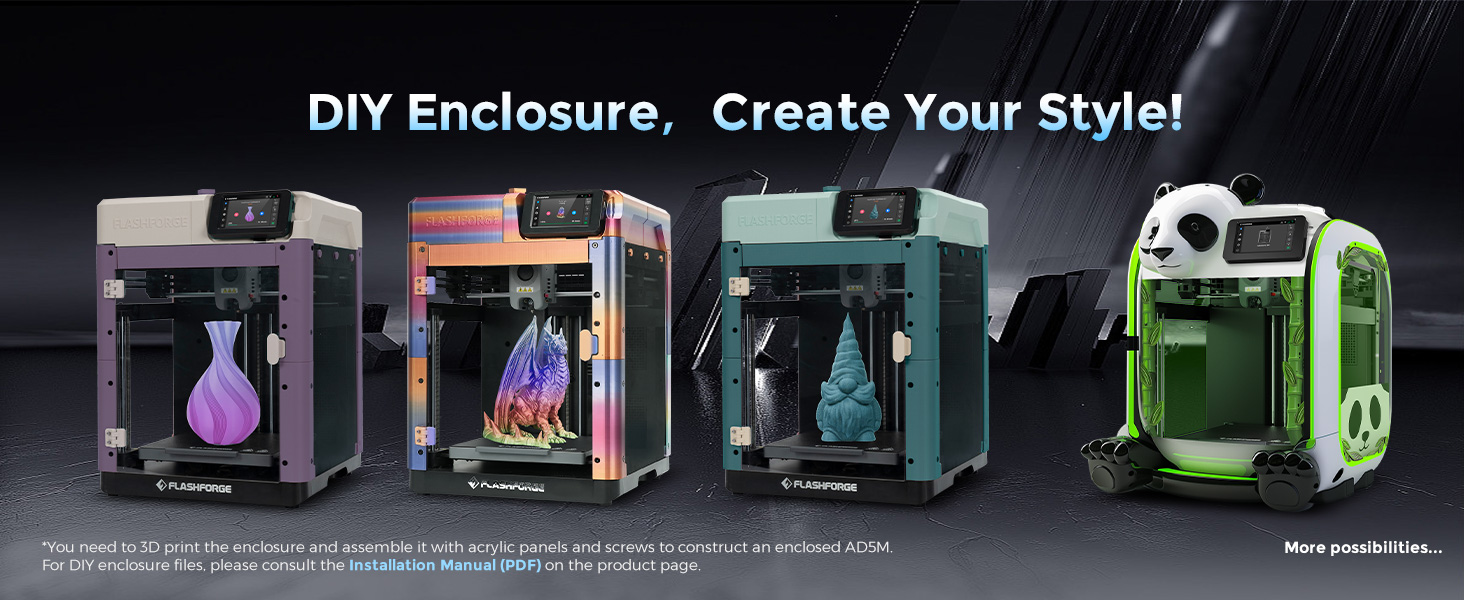
5 DIY Unique Enclosure

1 Print Failure Causes
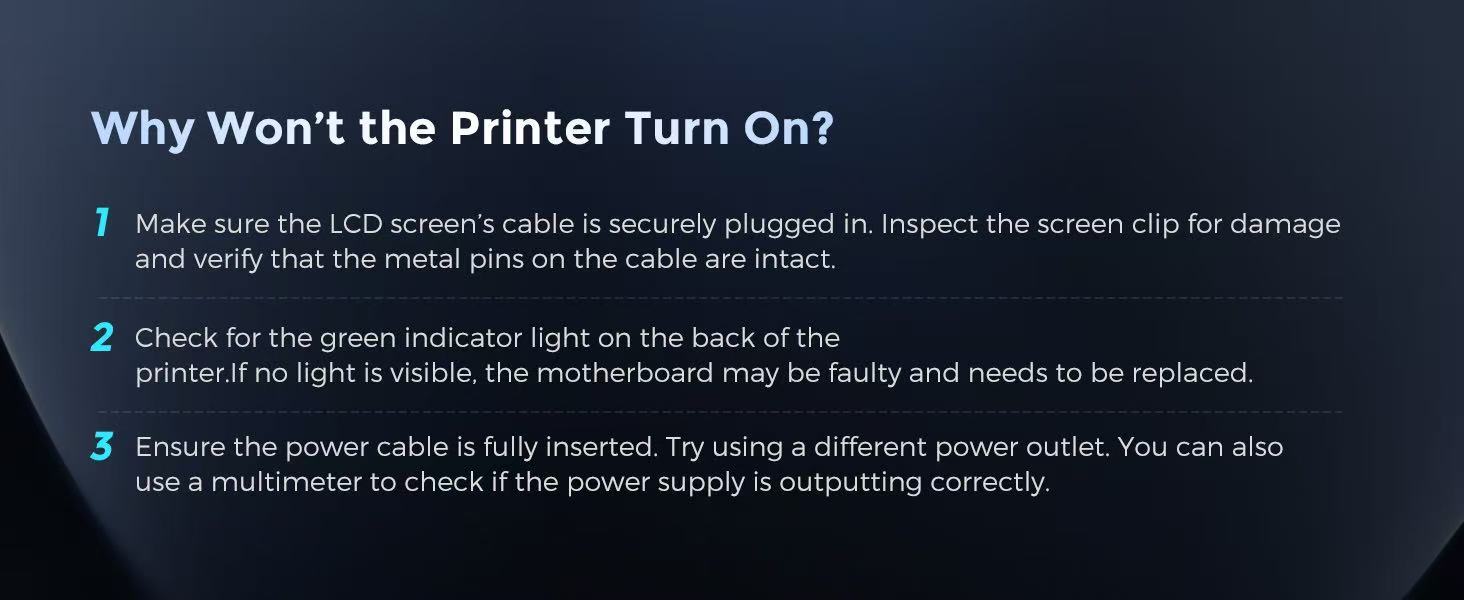
2 Printer Won’t Power On
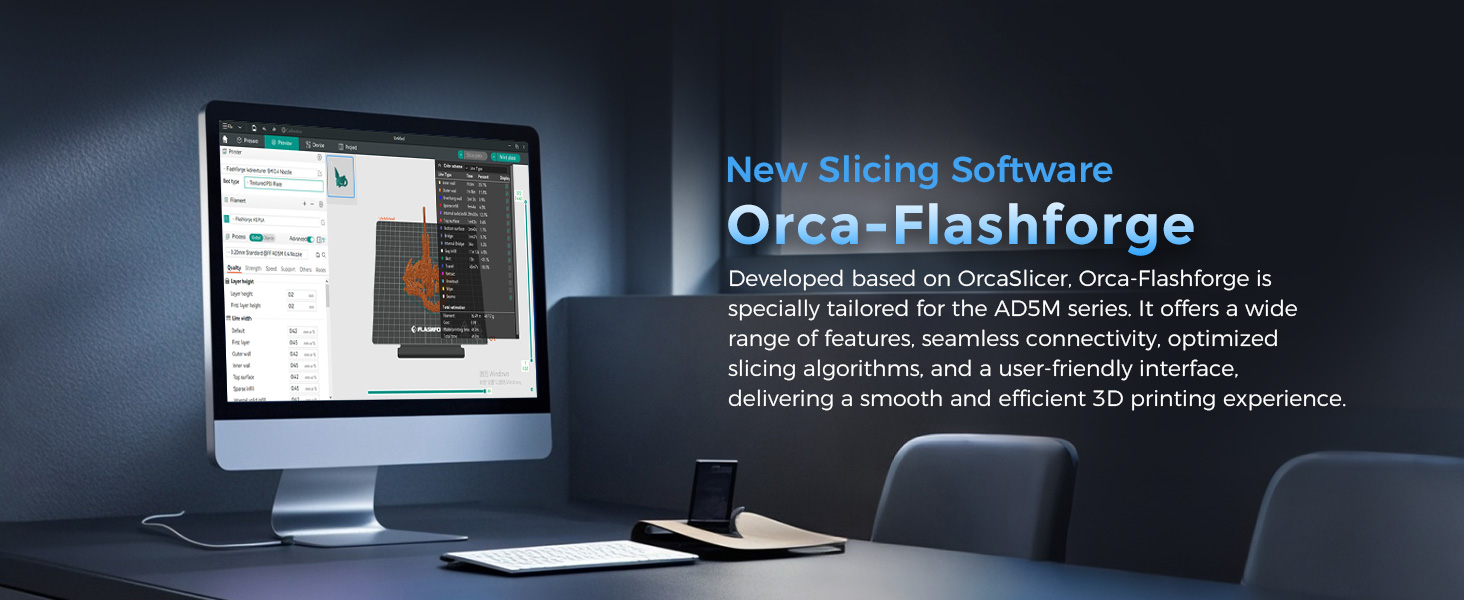
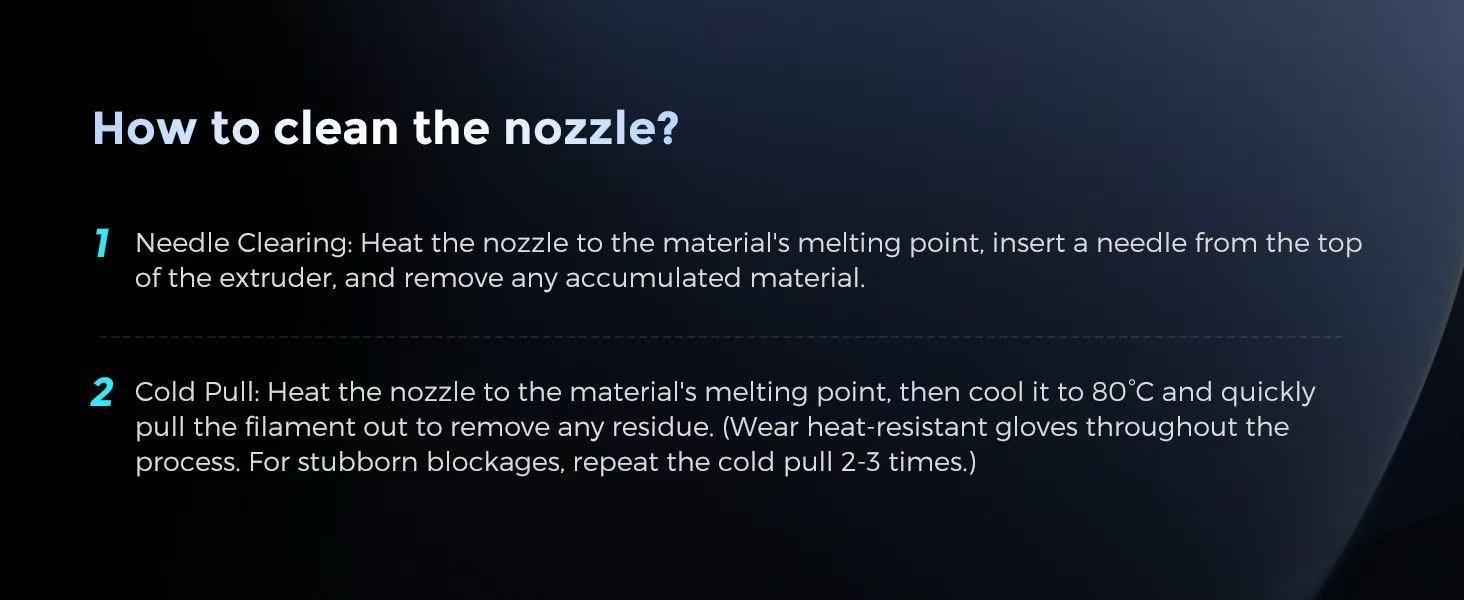
3 Nozzle Cleaning Guide
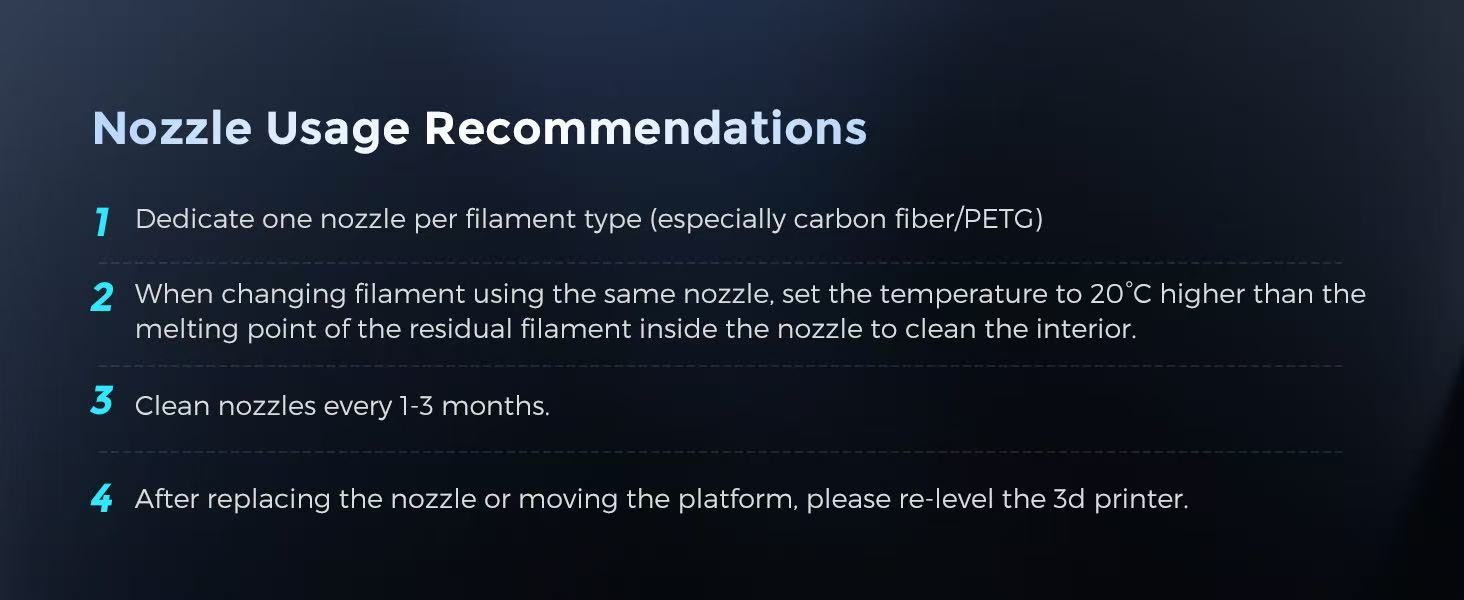
4 Nozzle Maintenance
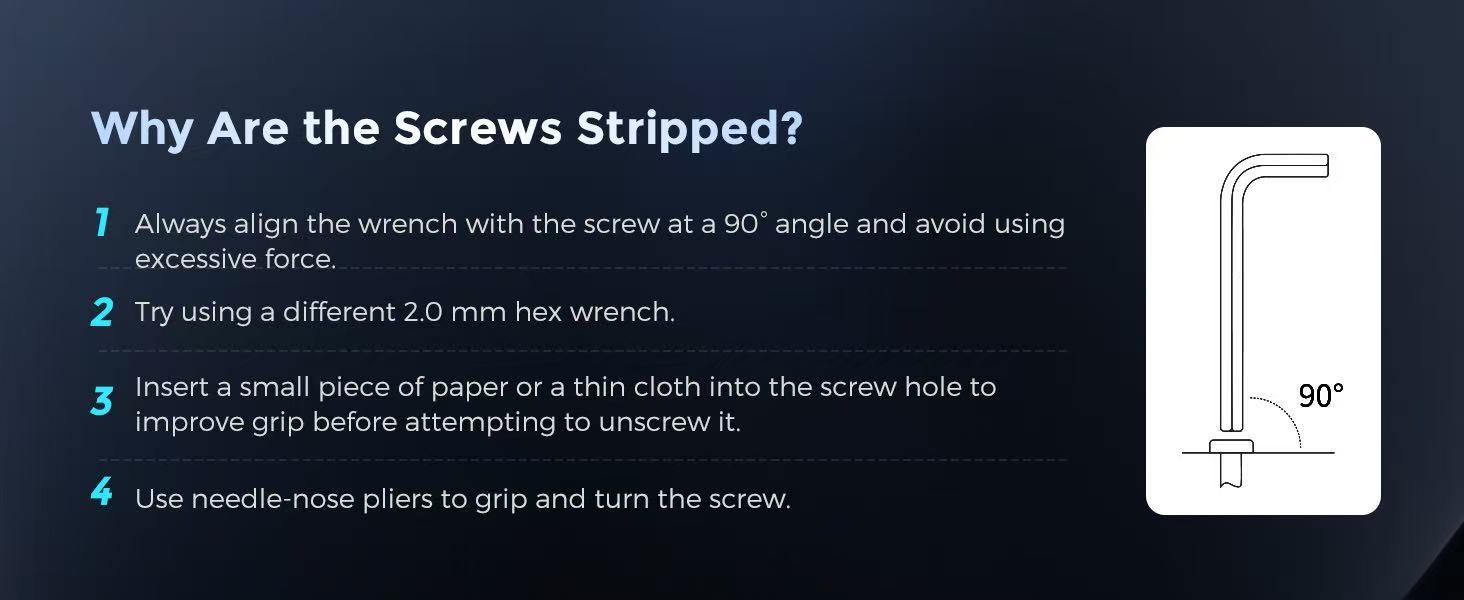
5 Fixing Stripped Screws
Elevate Your Prints with Effortless Excellence
Add to Cart
Add to Cart
Add to Cart
Add to Cart
Add to Cart
Add to Cart
Add to Cart
Customer Reviews
3.9 out of 5 stars 2,488
3.9 out of 5 stars 2,488
4.7 out of 5 stars 1,126
4.0 out of 5 stars 336
4.6 out of 5 stars 4,180
4.2 out of 5 stars 572
4.6 out of 5 stars 803
Price
$259.00$259.00
$419.00$419.00
$27.99$27.99
$26.99$26.99
$24.99$24.99
$25.99$25.99
$27.99$27.99
Leveling Type:
One-Button Auto Leveling
One-Button Auto Leveling
—
—
—
—
—
Travel Speed and Acceleration
600mm/s and 20,000mm/s²
600mm/s and 20,000mm/s²
—
—
—
—
—
Extuder Type
Max.280℃ Direct Drive
Max.280℃ Direct Drive
—
—
—
—
—
Filament Type:
PLA/ABS/PETG/ASA/TPU/CF/etc.
PLA/ABS/PETG/ASA/TPU/CF/etc.
—
—
—
—
—
Platform Type:
Double-Sided PEI Platform
Double-Sided PEI Platform
—
—
—
—
—
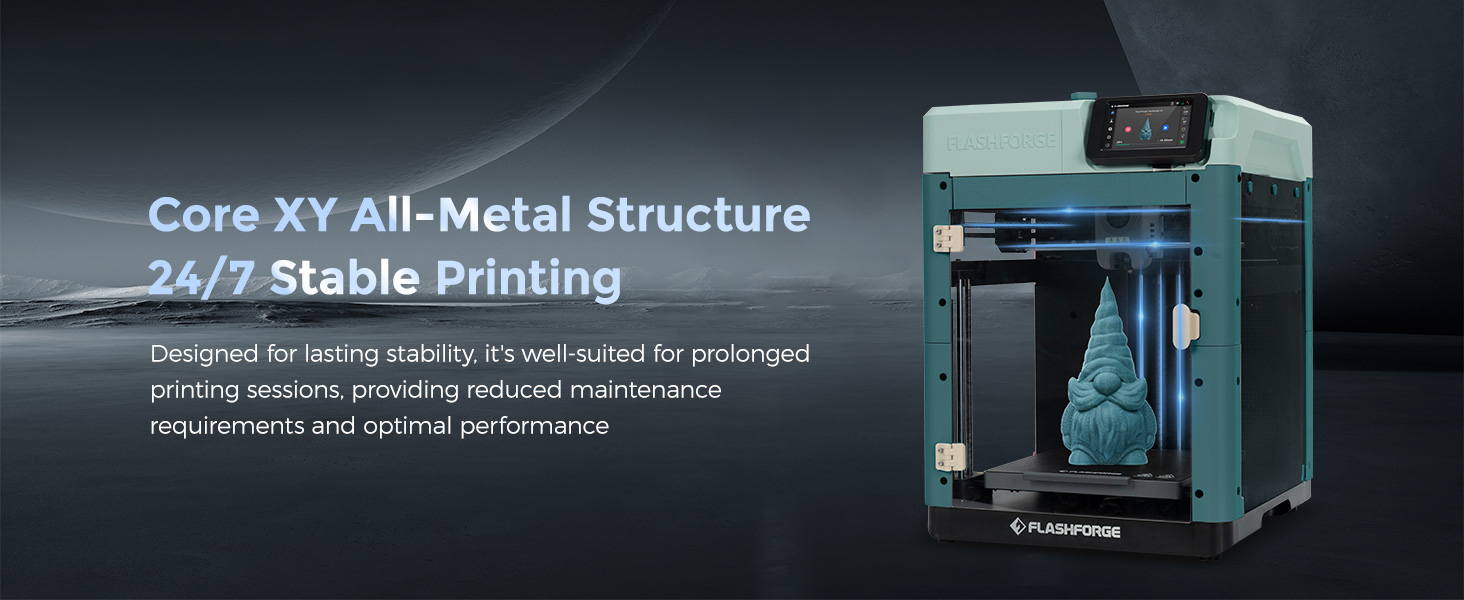
Structure:
All-metal Core XY Structure
All-metal Core XY Structure
—
—
—
—
—
Build Volume:
220 x 220 x 220 mm
220 x 220 x 220 mm
—
—
—
—
—
Interior Auxiliary Fan
✘
✔
✘
✘
✘
✘
✘
Camera
✘
✔
✘
✘
✘
✘
✘
Silent Printing
✘
✔
✘
✘
✘
✘
✘
Auto Power Off
✘
✔
✘
✘
✘
✘
✘
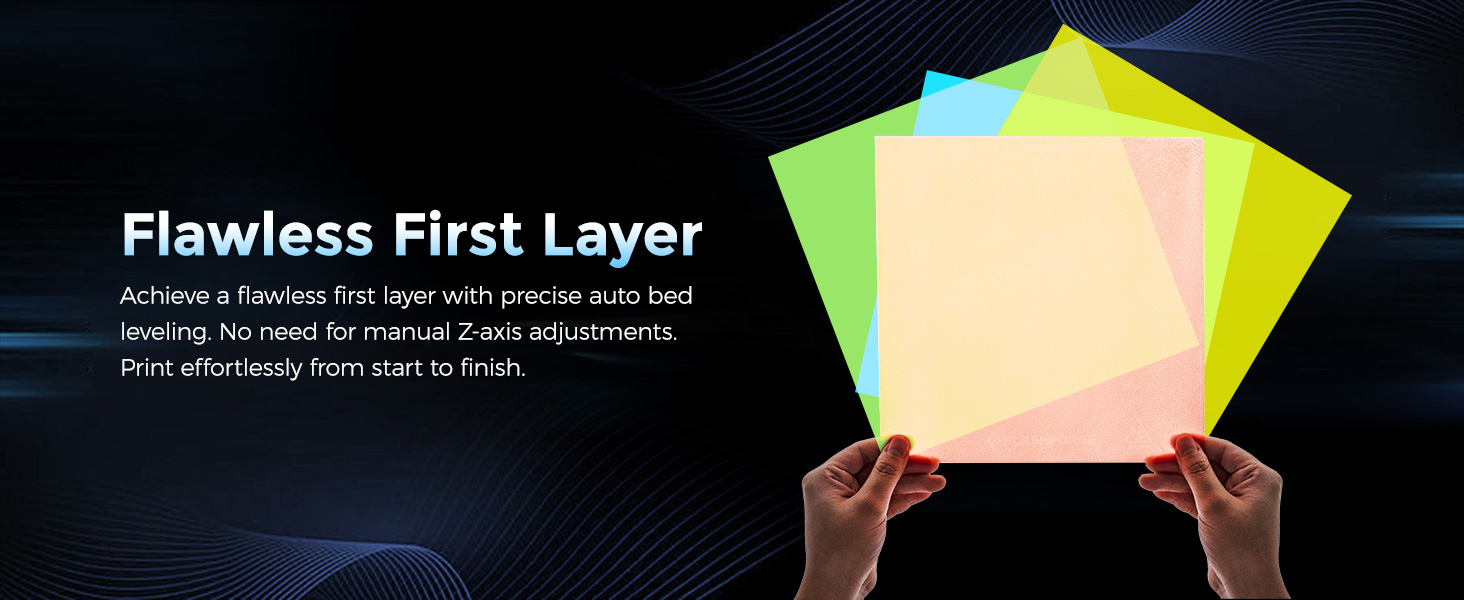
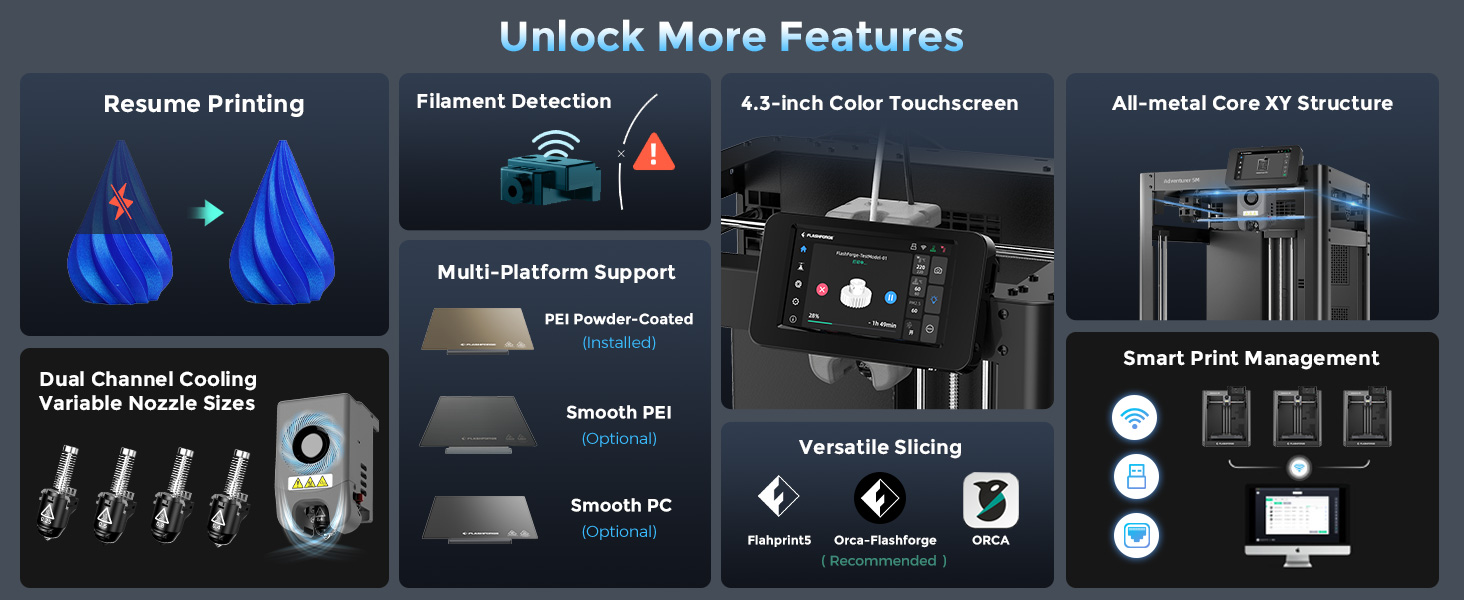
One-Click Automatic Printing: Experience hassle-free 3D printing with the Adventurer 5M Series. Enjoy automatic bed leveling for flawless first layers, ensuring consistent adhesion and saving time with no manual adjustments required.
12X Ultra Fast Printing: Featuring a Core XY structure with 600mm/s travel speed and 20000mm/s² acceleration, the AD5M maximizes efficiency, reduces production cycles, and ensures high precision, making it ideal for rapid prototyping and mass production.
Smart and Efficient Design: Quick 3-second nozzle changes, a high-flow 32mm³/s nozzle, and fast 35-second warm-up to 200°C deliver stable high-speed printing. Its dual-sided PEI platform and versatile options provide easy removal and adaptability for various creative projects.
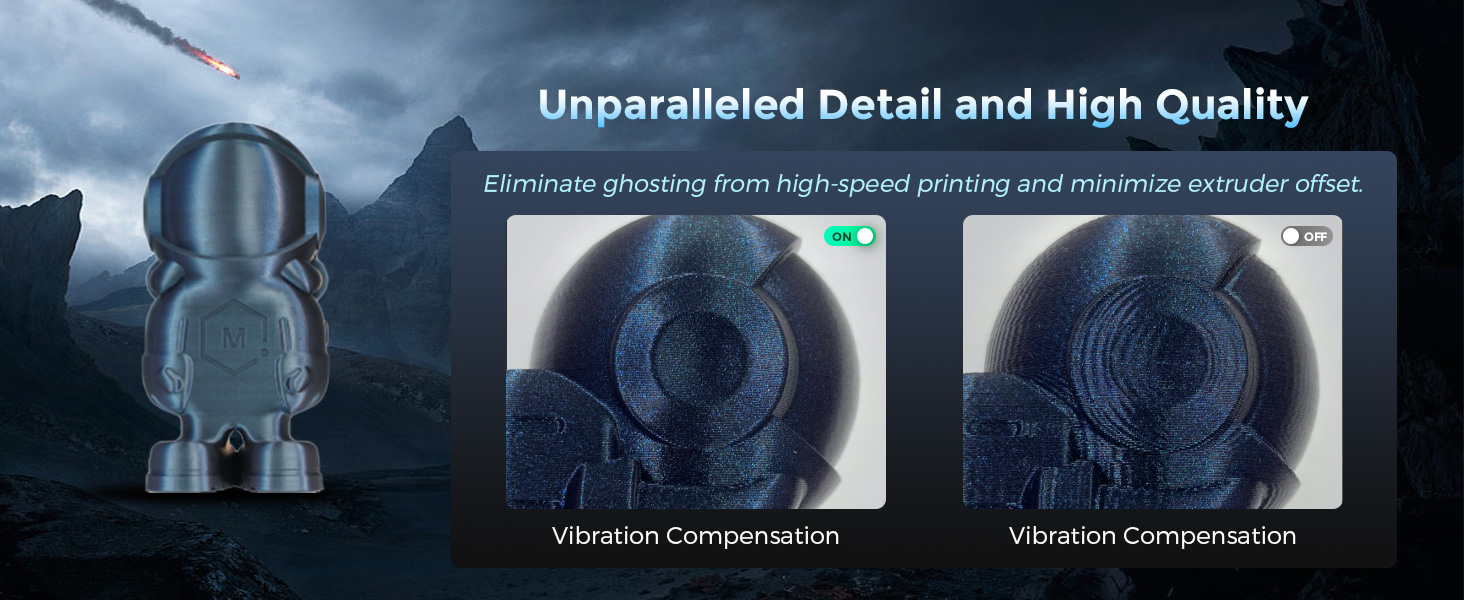
Superior Print Quality and Remote Monitoring: With dual-fan nozzles, vibration compensation, multiple nozzle sizes (0.25-0.8mm), and a 280°C direct extruder, the AD5M ensures top-tier print quality. Use the Flash Maker mobile app for real-time monitoring and intelligent operation, making your printing experience seamless.
Maintenance and Troubleshooting: For optimal performance, regularly maintain your printer by cleaning the nozzle and platform. If you encounter any issues, please refer to the A+ FAQ section for troubleshooting tips and solutions.
Customers say
Customers find the 3D printer easy to use, particularly for beginners, and appreciate its incredible printing speed of up to 600mm/s. The print quality and functionality receive mixed feedback – while some report great results, others mention the printer breaking down twice. Moreover, the value for money is debated, with some considering it a great product for the price while others find it not worth the investment. Additionally, the noise level and software quality also receive mixed reviews, with some noting very low noise levels while others report grinding gear sounds, and some praising the software while others find it poor.

M. Cochrane –
Great printer, great value. TLDR This thing is amazing for the money.
I run a small business and had been using two printers: an Elegoo resin printer (fantastic printer) for prototypes, and an Creality Ender 3 S1 (below average experience) for tools and fittings. The Adventurer 5M was added to the stable in a fit of rage and desperation incrimentally fueled daily by the Ender 3 S1. This is a review for the Adventurer, but I need to share the behavior I’d been accustomed to from my eldest workhorse, context is important.I acquired the Ender 3 new in box at the end of November 2024. The first, second, third, and fourth things it produced were various sized nests of knotted filament. The plate had no adhesion to speak of, the self leveling feature…didn’t, the physical distance the nozzle was from the print bed seemed to have little concern for the numbers indicating the Z-offset. I just figured it was my own inexperience and ineptitude preventing the machine from doing it’s best work. Over a time span of roughly 3 months, countless instructional videos step by step articles helped me to triangulate an almost acceptable, almost reliable combination of settings, adjustments, and physical add-ons that would allow the printer to do it’s job, most of the time. The best thing about the Creality product, is that it forced me into a level of competence I never would have attained with a reliable printer. It’s a lot like owning a cheap Ford: It’s just barely good enough to be called a car.Since the Ender 3 was my first foray into 3d printing, I just assumed that’s just how printers are: Frustratingly sensitive to EVERYTHING. A few days ago I realized the errors I was dealing with were repeating frequently enough that I knew how to counter most of the behaviors before the wheels came off (The adjustment knobs literally came off 18 hours into a rather large print last month).After steadily escalating jaw clenching frustration was no longer tenable, I tried resetting it to factory spec…which it wouldn’t do, it just beeped at me like a petulent child. Fine, I thought, I’ll update the firmware. A word to the anyone considering purchasing a Creality product: I would recommend against it. The firmware update process ignores the fact that most people don’t wish disassemble their machine to access a port that Creality decided shouldn’t be on the OUTSIDE of the machine. Also, the old addage “Keep is Simple, Stupid” isn’t terribly popular in that part of China. So, after doing my best to decode the cryptic instructions that later became clear, I loaded the update onto the SD card that came with the printer (which required the card to be reformatted for some reason) and followed the instructions in the helpful readme file. The read me file was one of FIVE files included in the download. I soon discovered that you need to load only ONE of those files to upgrade the control board’s firmware. The instructions were originally in Chinese and obviously passed through Google translate a few times to ensure adequate user confusion. The result? My Ender 3 S1 is now a brick.I could feel the veins in my forehead pulsing as I pulled up Amazon. I ordered the Adventurer in an act that I can only describe as “rage quitting” Creality products, never to look back.Boy am I glad I did. The new printer arrived this morning. Well played to the distributor, that was a turn around of less than 12 hours. After some minor assembly and a few downloads, the Adventurer roared to life with a happy little tune.With zero adjustments, no tuning required, no bed leveling, and no drama, the thing just works perfectly. I printed the included benchmark models one after the other with none of the abrasive behaviors Creality built into their “good enough” S1. I then switched the filament to PETG and began running calibration models. Again, perfect performance and holy cow it’s fast.It’s not a quiet printer, I wouldn’t recemmend locating it near a sleeping child, but that’s really no concern to me. I’m very pleased with my purchase.
BC –
Went from knowing nothing about 3D Printing to advanced mini printing and assembly in a day.
I had never been super interested in 3D Printing as I had no real use for it, and so never looked in to how any of it worked or how things were supposed to be set up. As I started getting more and more in to DIY tech stuff where the standard is 3D printed parts for assembly, as well as wanting to do more Wargaming stuff than I could reasonably afford, I decided to finally jump at getting a 3D Printer that was geared towards new users that have all the basic bells and whistles to minimize potential set up issues and any health hazards from having the thing set up in my bedroom, and the Flashforge 5M Pro was what I settled on. Worst case scenario, I could get the few things I needed then sell it to a friend who could use it more than i can so I’m not completely out $450.All that said to stress that I am a complete beginner and learned from knowing literally nothing as I set this thing up.Set-up was easy. Unbox it, follow the instructions to remove all packing and accessories then un-screw the bed. Turn it on and connect it to your WiFi network. Get the mobile app (which sucks) for your phone and Flashforge Orca for your desktop (which sucks less). Send the printer through its self calibration once it’s set where you want to keep it. Put the filament spool on the holder, feed it through the tube following the on-screen instructions and let the system prime the filament load (mine spat out a bunch of red filament from the factory QA testing before priming the included sample). Then, update the Printer’s firmware (this is important as the app and Orca will not be able to connect and control the printer without this step). Then, print the calibration cube. Then, print the Benchy. For me, there were absolutely no issues. Set up went without a hitch, calibration and benchmark prints went great, and the printer was ready for use after that.I grabbed some Official Battleshovel 39,999 stls to test how well things printed minis and figure out setting up support structures and managing print settings and then I went on to Cults3D and grabbed some cheap models of stuff I really liked from some creators and spent a couple days printing some cool stuff at higher resolution and refining my settings.Bed leveling before each print took a couple extra minutes but I’ve yet to have a failed print, the tip and bed both heat up to go mode really quickly, the size of the bed is great for pretty much anything I can think of short of full-sized multi-day prints of cosplay gear, print durability is as good as your settings are, this printer will do what you tell it to do without fuss, and the design of the printer is great. Sleek, enclosed, the internal ventilation is really nice to have, and the top and front clear doors are great for keeping an eye on things and getting in to the enclosure when needed.Noise is quieter than I thought it’d be. Don’t get me wrong if you’re light sleeper maybe consider having this away from your bedroom, but it’s just white noise in the background for me and easily ignoreable if you’re used to the sounds of electronics.My only real complaint that is barely even a complaint since it’s just nitpicking about a feature that really doesn’t need to be there is the camera is extremely low quality and struggles to stay connected to any app that uses it, but it does still work and lets me peak at the print when i’m away.All in all I was shocked at how easy it was to get this thing in to working order and learn enough to start just blowing through filament making stuff for the projects I’ve been putting off until I could either order parts from a 3d printing company or get a friend to do it for me. Again, I knew absolutely nothing about how any of this worked prior to getting this thing.If you’re a beginner looking for your first printer, this is an option I can’t recommend enough.
marine gandemer –
J’ai littéralement aucune compétences en machine 3d d’où l’achat de cette machine clef en main et je regrette rien ♡.Et j’adore instalation en 5 minutes, parametrage 2 et impression du petit cub rouge de test 10 min après le déballage.Elle est silencieuse pour une machine 3d (comparaison au grosse ouverte) on entend seulement les ventilateur pour le refroidissement = bruit d’un pc poussiéreux ^^.Elle a une jolie qualité de finition de pièceset un bon rendu qui peut être amélioré en diminuant la vite est autre technique (voir bateau).Les pièces qui sont changeable sont pas chères et au nombre de deux seulement ^^.Le plateau est en vente sur Amazon pour 15-20€ . Pour pouvoir enchaîner les impressions rapidement et la tête d’imprimante est aussi sur Amazon à 30€ . Donc rien avoir avec les DIY ou il faut des tonnes de pièces pour maintenir ça machine et excessivement chère .Attention la zone d’impression est de 15cm x15cm donc reste petit mais on peut couper les impressions :).En résumé, elle est pas chère et sans réglage donc parfait pour les foyers voulant une machine et bloquant sur le prix ou sur l’installation/maintenance. Et protège avec ca boite pour éviter au enfant de ce faire mal.Je vous la recommande donc à 300%.
Erfel Earl Yumul –
Flashforge Adventurer 3 is the best starter 3d printer for beginners as the quality of prints is totally good. This is an enclosed 3d printer wherein the temperature will be stable when printing.Very kind and responsible seller, I experienced some minor issues with this 3D Printer and this seller is 100% responsible and took care of my needs. Thank you.
matteo Soligo –
Aperta, accesa e subito ha stampato alla grande. Adesione sempre perfetta, definizione alta, con PLA ripiano a 55 gradi e filamento a 210 gradi stampa tutto alla perfezione senza sbavature!TOP!!!
TechHead –
This is my first venture into 3D printing and thanks to the Flashforge Adventurer 3 i am well and truly hooked!My brother is massively into 3D printing and i have asked him to print me some items in the past, he suggested i looked at buying myself one, but to be honest, whilst i am very good at new tech, 3D printing looked way too complicated for even me!Whilst browsing the Amazon daily deals i came across this printer, reading the reviews and watching a few online videos everyone seemed to be saying this device required very little knowledge and just kind of worked straight out of the box – i decided to take the plunge and ordered!When the printer arrived i was immediately super impressed by the build quality of the device and the super smart appearance of the machine. I looked at the instructions included and to be honest they were beyond pointless! I therefore watched a setup video online and hooked up the device. To my amazement it really was just plug and play! I had to download the flashprint 5 software which is free from the manufacturers website – again there is no real instructions on how to use this software but online videos helped me through it and it actually was pretty simple!The printer comes with a small test roll of 250g PLA filament in red. Loading the filament was super easy, just place the roll inside the machine, feed the end into the printer and use the touch screen to pull the filament through. The touch screen guides you through the whole process.I was now ready for my first 3D print – Super Excited! I downloaded a couple of free .STL files and loaded them into Flashprint, clicked a couple of buttons and it send the file to the printer. The display on the printer sprung to life and informed me it was receiving the file, it then displayed a nice 3D image of the item i was printing – which was a Benchy (tug boat). The print took around 1hr 30 mins but WOW – how good did this little boat look!!! That’s it i was hooked!! I ordered some more filament in black from Amazon and my next project was a skull that could hold pens/pencils. That has now been printing for around 8hrs and has around 3hrs left – so yes it’s not a fast process – the machine takes it time, but the detail is just so amazing!What i love about the machine is that it is super quiet, it does not smell when printing, the print area is fully enclosed, touch screen is great, footprint is nice and compact, internal lights make checking on your print really easy, heat up time is astonishingly fast! Biggest plus is that it really is plug and play with no 3D printing knowledge needed!What i didn’t like so much about the machine was, camera is pretty poor quality – you also can not view this in the slicing software but instead have to go to the printers IP address to view – it’s good enough for you to check on your print but it’s quite dark and lacking in detail, the quality looks like VGA rather than 720p. The printer can also only house 500g reels of filament, which are not value for money compared to larger 1kg rolls, however you can easily solve this buy purchasing a filament holder and having your PLA on the outside of the machine. The print bed is fairly small allowing a max of 150mmx150mmx150mm prints – but for a beginners machine i feel that size print is fine for an introduction into the world of 3D printing.In summary, if you are looking at getting into 3D printing then i very highly recommend you look at investing in the Flashforge Adventurer 3 machine – you honestly can not go wrong with this smart looking device! It is truly is ideal for a novice/beginner who has extremely limited knowledge of this daunting hobby. If you are a more experienced 3D printer then you may want to look elsewhere as this machine is pretty locked down in terms of firmware and customisation options.A truly amazing 3D Printer – i am totally in love with this device! I know for a fact i will be upgrading in the future and getting another machine that can perhaps print a little faster and have a larger print area. I will definitely consider getting another larger flashforge printer as i am super impressed with their product.I can not recommend this enough!!! Over the Moon with it!I hope that you found my review helpful
thomas –
Choisi pour son caractère “plug & play”, je n’ai pas été déçu de ce côté là. Simplement branchée puis étalonnée facilement (l’imprimante prend 9 points sur la plateforme que l’utilisateur doit ajuster via l’écran tactile. Personnellement j’ai étalonné à l’aide d’une feuille de papier : elle doit toucher la tête d’impression mais quand même pouvoir glisser sur la plateforme). J’ai de suite fait imprimer le modèle de cube déjà présent dans la mémoire. J’ai été agréablement surpris du résultat, aussi bien que l’on est en droit de l’attendre d’une imprimante 3D filaire bien réglée.Après quelques essais, l’impression a l’air fiable, sur les petites pièces que j’ai imprimé jusqu’à présent. Ce qui nous amène à la petite contrainte de ce modèle : elle ne peut imprimer que des pièces de 150x150x150 mm. Ce n’est pas forcément gênant (en tout cas ça ne l’est pas pour moi – je l’ai achetée en connaissance de cause) mais à prendre en compte.En revanche, la chauffe est très rapide, l’imprimante est assez silencieuse (pour une imprimante 3D), si ce n’est ces horribles bips au démarrage de l’imprimante et à la fin d’une impression, qui heureusement sont désactivables via le menu.Autre petit défaut, l’imprimante n’a jamais réussi à se connecter à mon réseau wifi (mais mon code wifi compliqué en est peut être la cause), donc je l’ai branchée en filaire.Enfin, le logiciel d’impression 3D dédié FlashPrint est tout à fait suffisant, il est assez intuitif. Il permet peut être un peu moins de finesse de réglage que d’autres logiciels, mais ceux-ci sont alors plus complexes. A choisir en fonction des besoins. Je veux quelque chose de “plug & play” donc FlashPrint me convient. Et avec FlashPrint, l’envoi d’impression 3D via le réseau est a priori fiable et rapide.Cette imprimante répond globalement à mes attentes, je la recommande donc à ceux qui comme moi sont novices dans le milieu de l’impression 3D. Au final, la seule condition pour l’acquérir est de savoir dessiner en 3D… élémentaire, mais il convient de le rappeler tout de même.